Royal-Infrared-heating-white-trademark

Warranty

Royal-Infrared-heating-white-trademark

WARRANTY

Learn about our product warranty, including available coverage, applicable conditions and the support provided by Royal Infrared Heating® if assistance is required
ES-high-quality-components-whiten

KEEP YOUR
WARRANTY VALID

Install, operate and maintain your product according to the official user manual and installation guide. Use the correct electrical supply and arrange professional installation whenever hardwiring or specialist electrical work is required.

Keep your order confirmation, invoice, product label and serial number in a safe place. Unauthorised modifications, unsuitable installation, accidental damage or repairs completed without approval may affect warranty eligibility.


espejo-infrarojo-calefactor-royal-infrared-2

WARRANTY SUPPORT

Need assistance with your product? We’re here to help.

Send us your order number, product details and photos or videos of the issue so our team can review your warranty request.

espejo-infrarrojo-calefactor-royal-infrared

Prefer to fill in the form?

Quick Contact Form 2026
Royal-Infrared-heating-white-trademark
Royal-Infrared-heating-colored-trafemark

INNOVATIVE SOLUTIONS

Efficient, durable and designed for modern living

WIDE PRODUCT RANGE

Infrared heaters and saunas for every space

PERSONALISED SERVICE

Expert advice before and after your purchase

FAST, SECURE DELIVERY

Carefully handled delivery across Europe

Based in Spain

Local stock & support from our Spanish warehouses

Warranty Included

Reliable cover for complete peace of mind

ESTABLISHED SINCE 2010

Trusted infrared expertise built over many years

EUROPE-WIDE SERVICE

Supporting homes and businesses across Europe

Royal-Infrared-heating-white-trademark

Refund Policy

Royal-Infrared-heating-white-trademark

REFUND POLICY

Review our cancellation, return and refund process, including eligibility requirements, applicable timeframes and the steps for submitting a request.

ES-high-quality-components-whiten

CLEAR RETURNS.
TRANSPARENT REFUNDS.

We offer a refund and/or exchange within 30 days of your purchase. If 30 days have passed since your purchase, you will not be offered a refund and/or exchange of any kind.

Eligibility for Refunds and Exchanges

  • Your item must be unused and in the same condition in which you received it.

  • The item must be in the original packaging.

  • To complete your return, we require a receipt or proof of purchase.

  • Only regular-priced items can be refunded; sale items cannot be refunded.

  • If the item in question was marked as a gift when purchased and was shipped directly to you, you will receive a gift credit for the value of your return.

Exchanges

We only replace items if they are faulty or damaged. If you need to exchange it for the same item, please send us WhatsApp message, and we will send you the address to which the item should be returned.

Exempt Goods

The following goods are exempt from refunds:

  • Gift cards.

  • Custom-made products, for example, “Balnera S Custom.”

Partial Refunds

Partial refunds may be granted for:

  • Any item that is not in its original condition, is damaged or is missing a part for reasons that were not due to our error.

  • Any item that is returned more than 30 days after delivery.

Once your return is received and inspected, we will send you an email confirming that we have received the returned item. We will also notify you whether your refund has been approved or rejected.

If approved, your refund will be processed, and a credit will automatically be applied to your credit card or original payment method within a certain number of days.

Late or Missing Refunds

  • If you have not yet received a refund, first check your bank account again. Then contact your credit or debit card company. It may take some time before your refund is officially posted.

  • If you have completed these steps and still have not received your refund, please send us WhatsApp message.

Shipping

  • We will send you the return address. Please send us WhatsApp message.

  • You will be responsible for paying your own shipping costs to return your item. We will cover the return and replacement shipping costs if a product arrives in poor condition.

  • Shipping costs are non-refundable. If you receive a refund, the return shipping cost will be deducted from your refund.

  • Depending on where you live, the time required for your exchanged product to reach you may vary.

  • Please note that we cannot guarantee that we will receive your returned item.

RETURN & REFUND SUPPORT

Need assistance with a return? We’re here to help.

Send us your order number, product details, reason for the return and photos showing the item’s condition. Please contact us before sending any product back.

espejo-infrarrojo-calefactor-royal-infrared

Prefer to fill in the form?

Quick Contact Form 2026
Royal-Infrared-heating-white-trademark
Royal-Infrared-heating-colored-trafemark

INNOVATIVE SOLUTIONS

Efficient, durable and designed for modern living

WIDE PRODUCT RANGE

Infrared heaters and saunas for every space

PERSONALISED SERVICE

Expert advice before and after your purchase

FAST, SECURE DELIVERY

Carefully handled delivery across Europe

Based in Spain

Local stock & support from our Spanish warehouses

Warranty Included

Reliable cover for complete peace of mind

ESTABLISHED SINCE 2010

Trusted infrared expertise built over many years

EUROPE-WIDE SERVICE

Supporting homes and businesses across Europe

icon-smart-thermostats

Thermostat Molis Installation & Setup Guide

icon-smart-thermostats

Molis Setup

Clear installation and setup instructions to help you connect, configure and manage your Molis smart heating thermostat safely and easily

ES-high-quality-components-whiten
fv26

Website rating

4.9 Royal Infrared Heating reviews

Based on 900+ reviews

Effortless Installation for Maximum Comfort

At Royal Infrared Heating®, we believe smart heating should be simple to install and easy to use. The Molis thermostat is designed for convenient temperature control, combining modern functionality with a clean, wall-mounted design. With clear installation instructions and straightforward setup, Molis provides an efficient way to manage your heating. All electrical connections must be completed by a qualified electrician to ensure safe and reliable operation.

Quick and Simple Wall Mounting

Installing your Molis thermostat is straightforward with the correct preparation. Once a suitable wall location has been selected, the thermostat can be securely mounted and connected to your compatible heating system. After installation, follow the setup guide to adjust temperature settings, configure your heating schedule and connect to WiFi for convenient app control. Our step-by-step Installation Guide is available below.

1. Prepare the Installation Tools

Before installing the thermostat, make sure you have the necessary tools and mounting accessories ready.

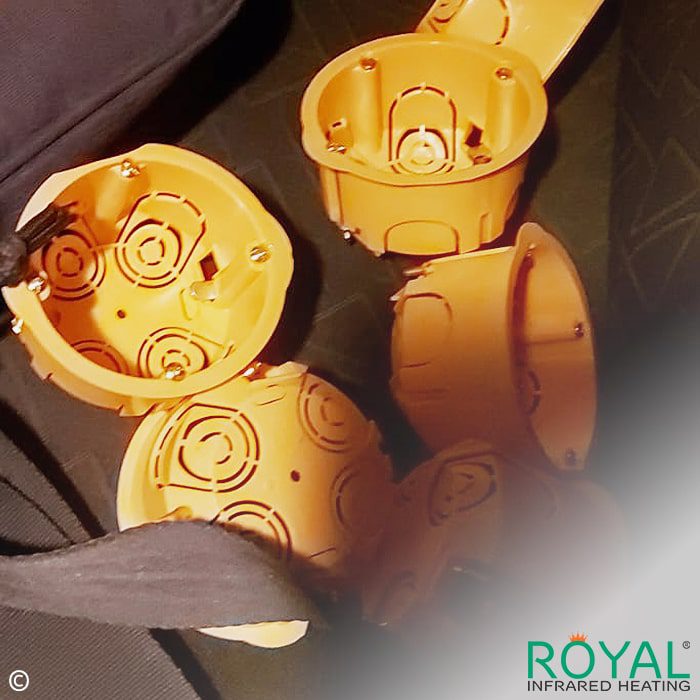
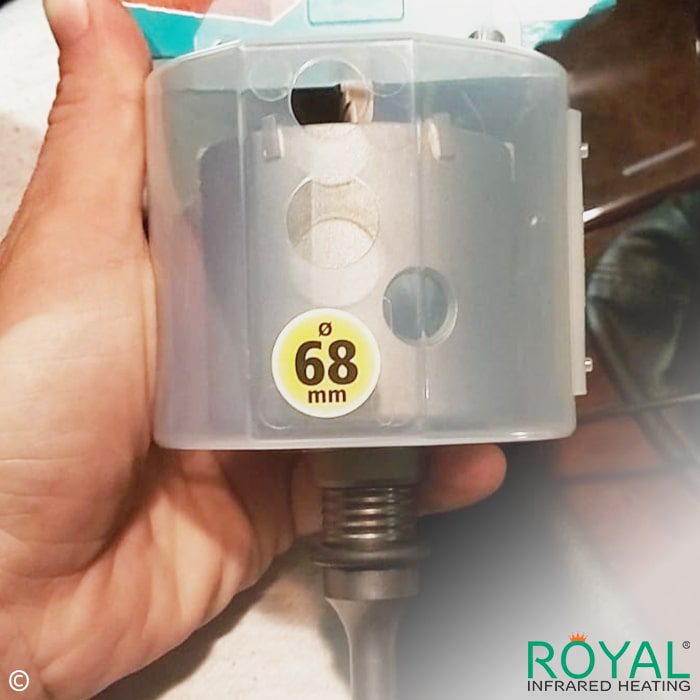
You may need a screwdriver, a suitable drill bit, a wall mounting box and the appropriate fixings for your wall type.

Please note: The drill bit, plastic wall box and installation tools are not included in the thermostat package. These can be purchased separately from Leroy Merlin or a similar hardware store.

Our friendly team is always happy to recommend the correct accessories and can even help you order everything you need for delivery directly to your home.

2. Prepare the Wall Opening

Choose a suitable position for your thermostat, away from moisture, water and condensation.

If a compatible mounting box is not already installed, a suitable wall opening must be prepared using the appropriate drilling equipment.

The thermostat is compatible with 86 mm concealed mounting boxes and 60 mm European mounting boxes.

Please note: The drill bit and plastic mounting box must be purchased separately. Our team can help you select the correct products and arrange home delivery.

Wall preparation and electrical installation should be handled by a qualified professional.

3. Drill the Wall Opening

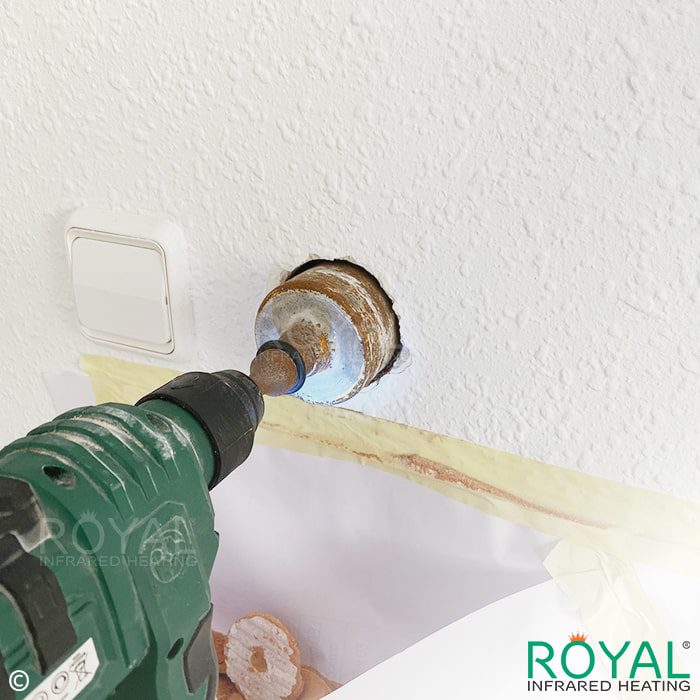
Choose a suitable position for the thermostat and mark the location where the electrical mounting box will be installed.

Using an electric drill with an appropriate hole saw attachment, carefully create an opening in the wall.

Please note: The drill and hole saw attachment are not included in the installation set. They can be purchased separately from Leroy Merlin or a similar hardware store.

4. Prepare the Mounting Opening

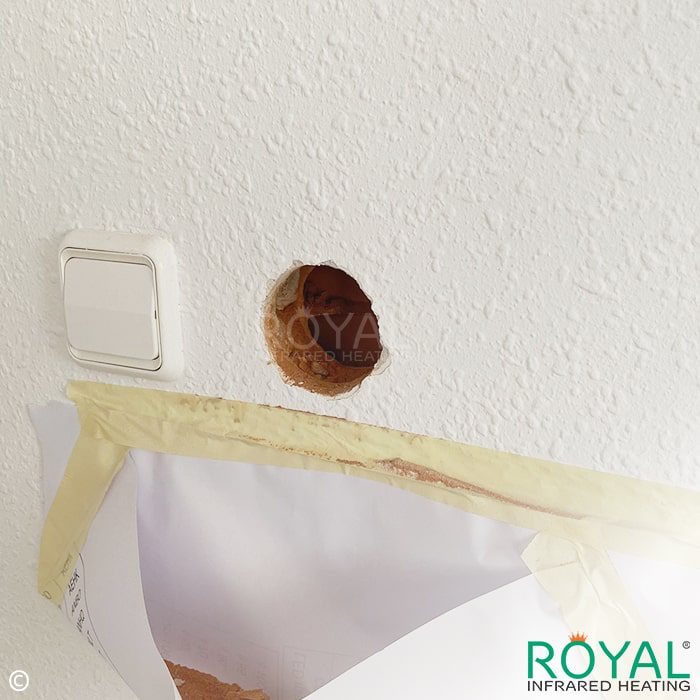
Once the drilling is complete, carefully remove any loose material and check that the opening is clean and correctly sized for the electrical mounting box.

Ensure the opening is properly positioned and ready for installation.

Need assistance? Our friendly team can help you select the correct drilling accessories and mounting box, or even assist with ordering them for delivery directly to your home.

5. Install the Electrical Mounting Box

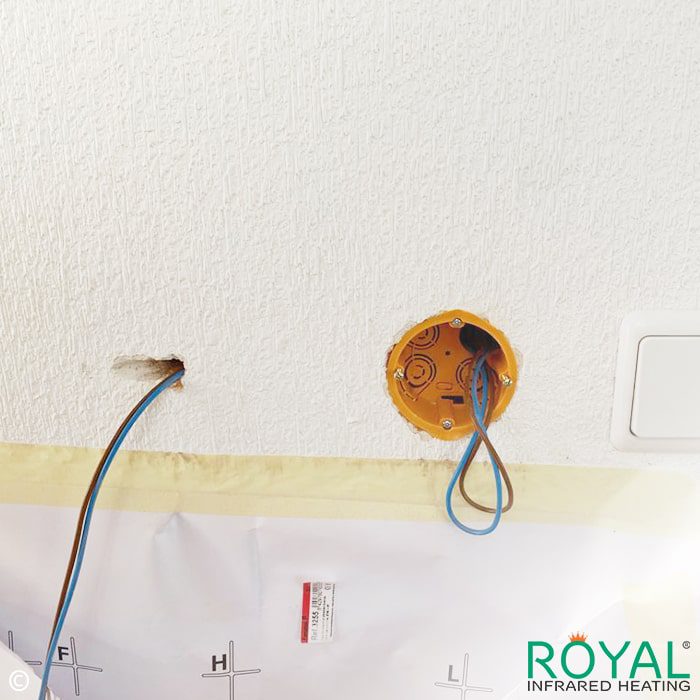
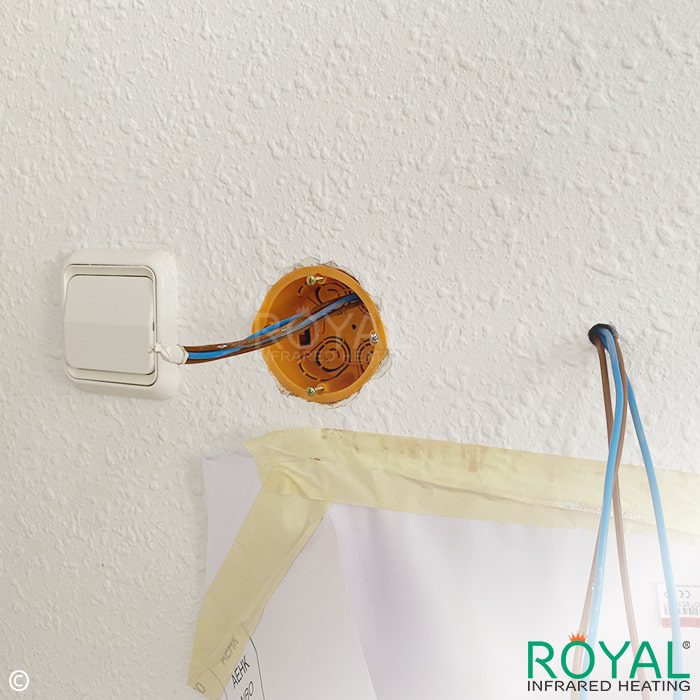
Place a suitable plastic electrical mounting box into the prepared wall opening and secure it according to the manufacturer’s instructions.

A qualified electrician should carefully route the necessary power supply and heating cables into the box, leaving sufficient length for connection to the thermostat.

Please note: The plastic mounting box is not included in the installation set and must be purchased separately.

6. Prepare the Electrical Connections

With the mounting box securely installed, carefully position the power supply and heating cables so they are ready for connection to the thermostat.

Ensure the cables are correctly identified, properly arranged and accessible for the next installation step.

Important: All electrical work must be carried out by a qualified electrician, with the power supply completely switched off during installation.

7. Connect the Electrical Wiring

Before proceeding, ensure the electrical power supply is completely switched off.

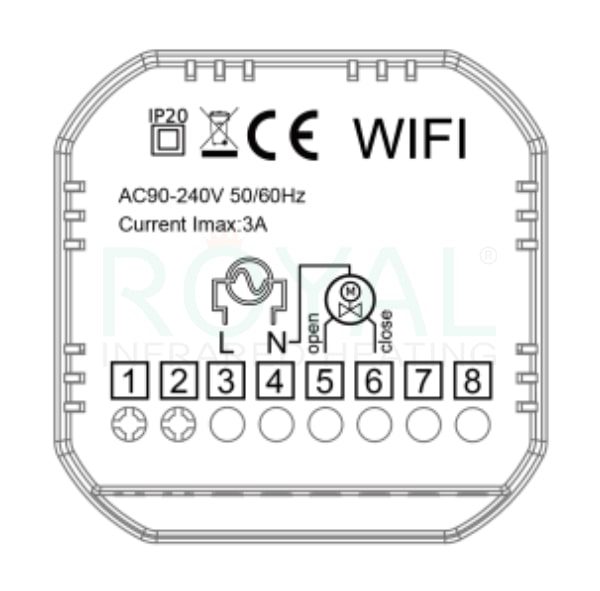
A qualified electrician should connect the power supply and heating system to the appropriate terminals, following the supplied wiring diagram.

Important: The thermostat requires a 90–240V AC power supply and has a maximum current rating of 3A. All electrical connections must be completed by a qualified electrician.

8. Open the Thermostat Housing

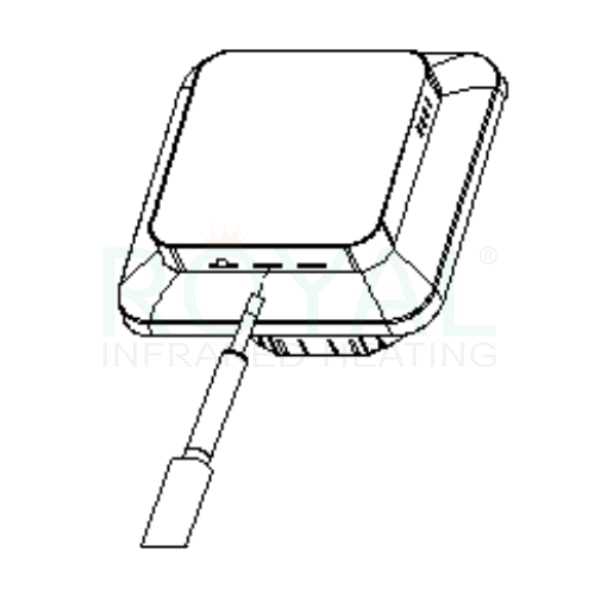
Insert a small flat-blade screwdriver into the opening at the bottom of the thermostat housing, as shown in the illustration.

Gently release the retaining clip to separate the front cover from the mounting base.

Carefully open the housing without applying excessive force or damaging the internal components.

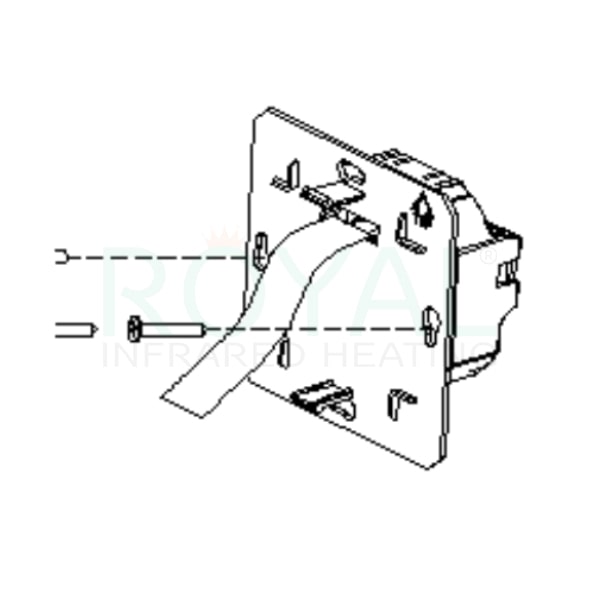
9. Secure the Thermostat to the Wall

Position the thermostat’s mounting base onto the prepared electrical mounting box, ensuring the cables are safely arranged behind it.

Secure the base using the appropriate fixing screws, as shown in the installation diagram.

Once the mounting base is firmly attached, carefully refit the front cover and ensure the thermostat sits securely against the wall.

After a qualified electrician has checked the installation, the power supply can be restored.

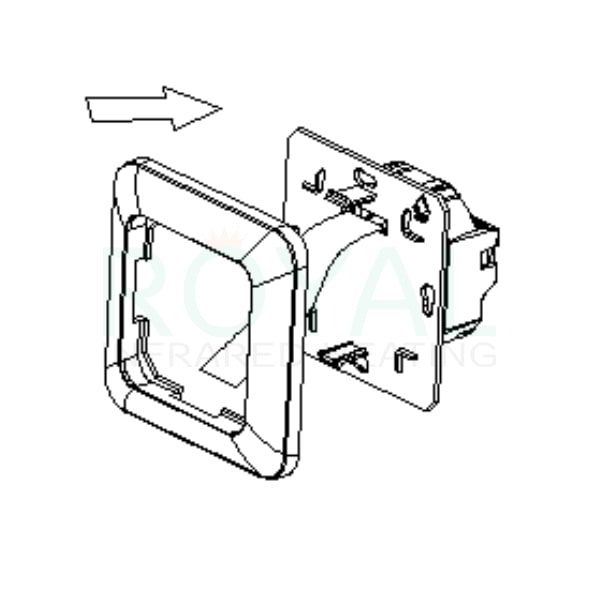
10. Attach the Thermostat Front Panel

Once the mounting base has been securely installed and the electrical connections have been checked, carefully align the front panel with the mounting frame.

Gently push the front panel towards the base, following the direction shown in the illustration.

Ensure the panel is correctly aligned with the retaining clips before applying pressure. Avoid forcing the components together.

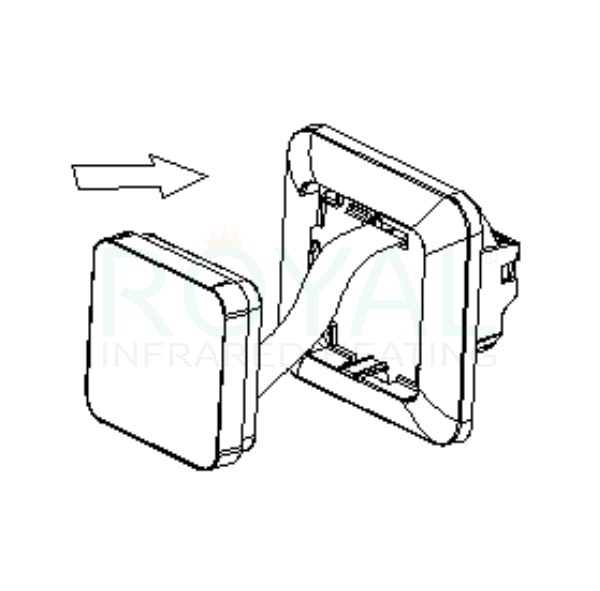
11. Secure the Thermostat Housing

Carefully push the front panel into the mounting frame until the retaining clips engage and the housing clicks securely into place.

Check that the thermostat sits evenly against the wall and that there are no visible gaps between the front panel and the mounting base.

Once the installation has been checked by a qualified electrician, the power supply can be safely restored.

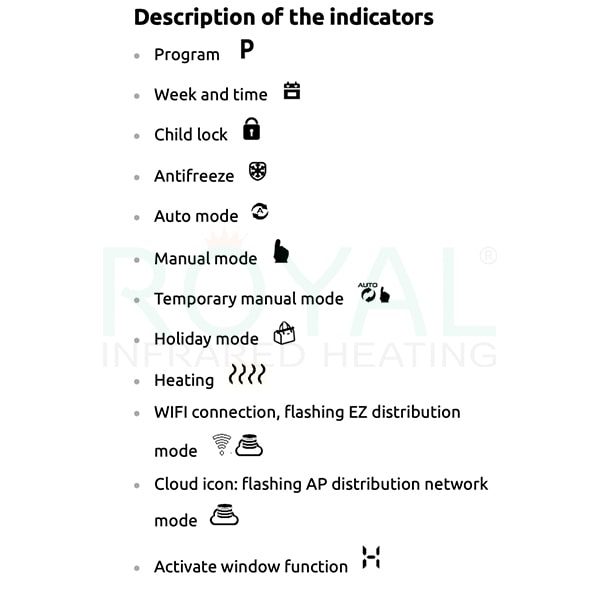
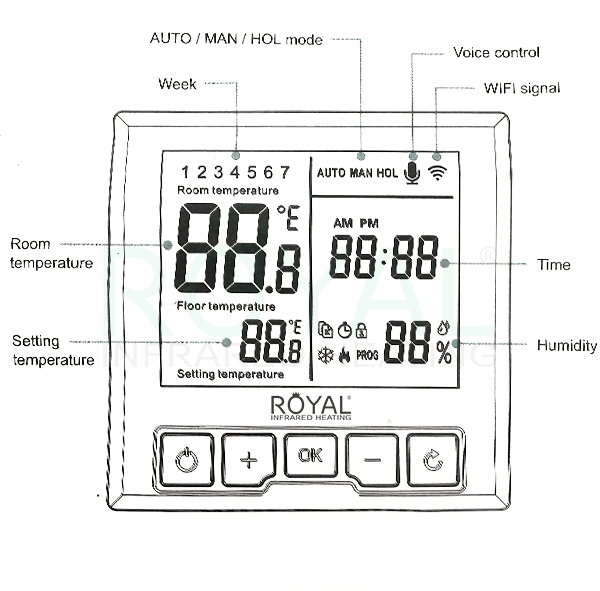
12. Understand the Thermostat Display

Once powered on, the thermostat displays indicators that help you monitor and manage your heating settings.

Familiarise yourself with the available symbols, including Auto, Manual, Holiday, Child Lock, Antifreeze and Heating modes.

The display also includes WiFi connection indicators, time and programme settings, and additional functions such as open-window detection.

Refer to the indicator guide shown below to understand each symbol before configuring your preferred heating settings.

1. Download the Tuya Smart App

Scan the QR code shown in the installation guide to download the Tuya Smart app directly to your smartphone.

Alternatively, search for Tuya Smart in the Google Play Store or Apple App Store.

Install the app and ensure your smartphone is connected to your home WiFi network before proceeding with the thermostat setup.

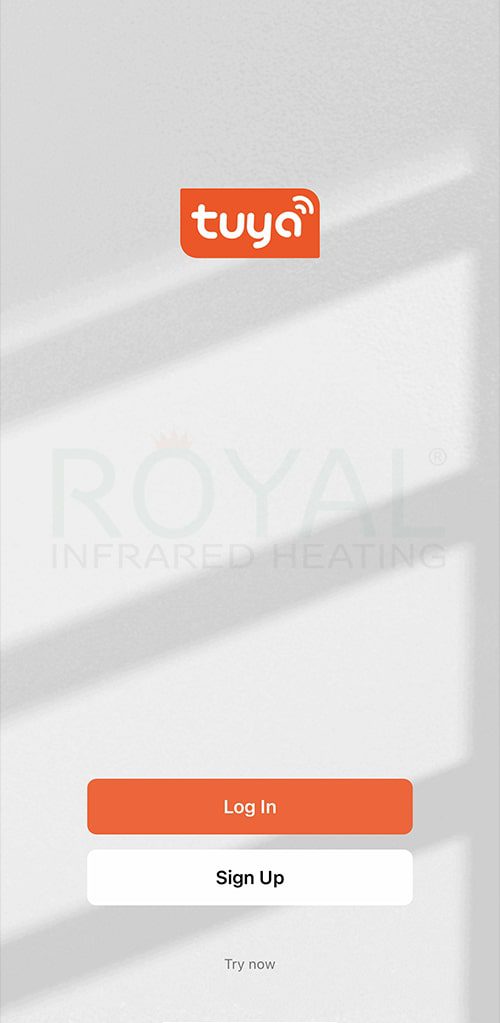
2. Open the App and Create an Account

Once the Tuya Smart app is installed, open it on your smartphone.

Tap Sign Up to create a new account, or select Log In if you already have one.

Follow the on-screen instructions to begin registration and prepare your account for connecting the thermostat.

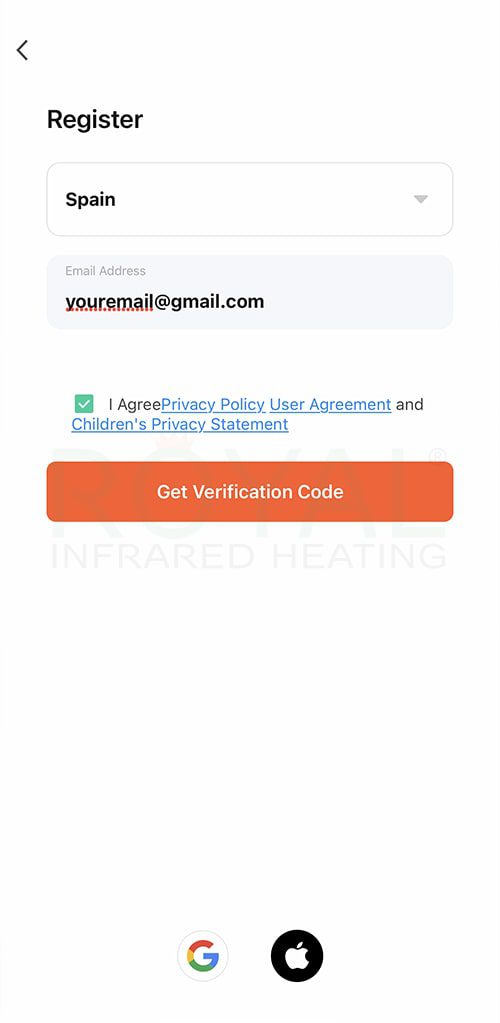
3. Register Your Account

Select your country or region and enter your email address in the registration form.

Read and accept the Privacy Policy and User Agreement, then tap Get Verification Code.

Check your email for the verification code and enter it in the app to continue registration.

Once your account is ready, you can proceed with connecting the thermostat to WiFi.

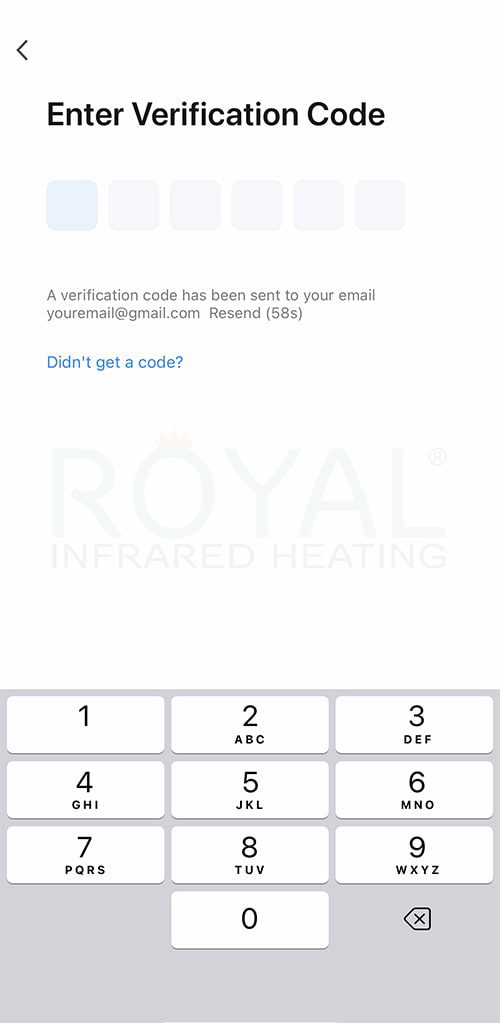
4. Enter the Verification Code

Check your email inbox for the verification code sent by the Tuya Smart app during registration.

Enter the six-digit code into the verification fields displayed on your smartphone.

If you haven’t received the email, check your spam folder or tap Resend to request a new verification code.

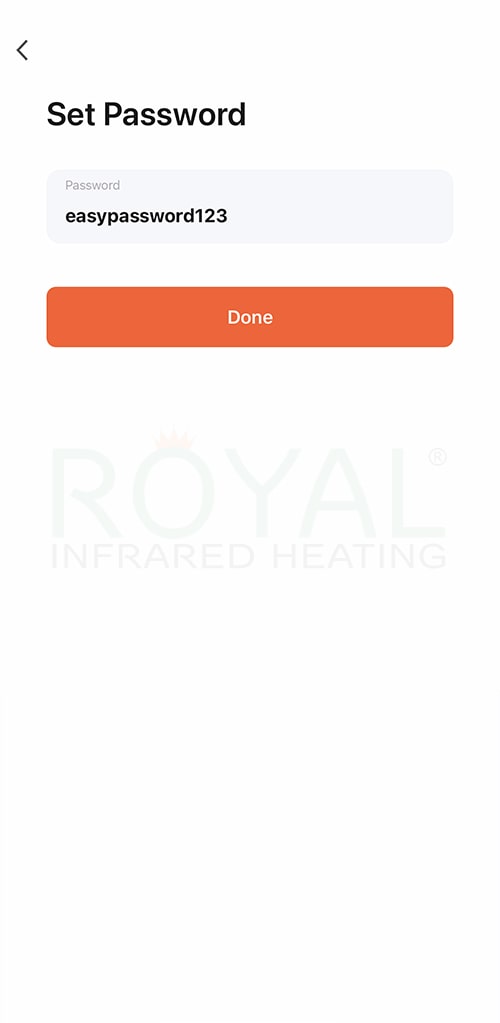
5. Create Your Account Password

Once your email address has been verified, the app will ask you to create a password for your account.

Choose a secure password and enter it in the designated field.

Tap Done to complete your registration and access the Tuya Smart app, where you can begin connecting your thermostat.

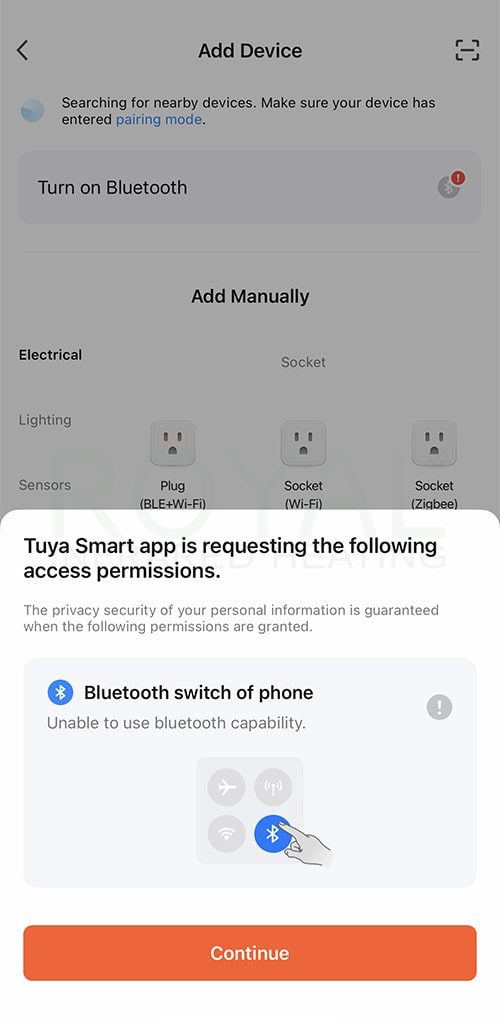
6. Enable Bluetooth Permissions

After completing registration, open the Add Device section in the Tuya Smart app.

The app may request permission to access your smartphone’s Bluetooth connection to discover nearby devices.

Turn on Bluetooth in your phone settings, then tap Continue to grant the required permissions and proceed with adding your thermostat.

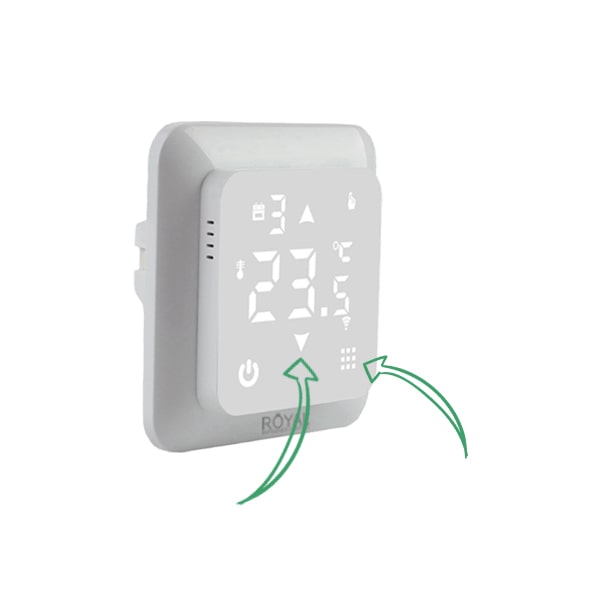
7. Activate WiFi Pairing Mode

Before adding the thermostat to the app, make sure it is powered on and ready for WiFi connection.

Press and hold the two touch buttons indicated by the green arrows in the illustration until the WiFi indicator begins flashing.

Once the indicator is blinking, the thermostat is ready to be connected through the Tuya Smart app.

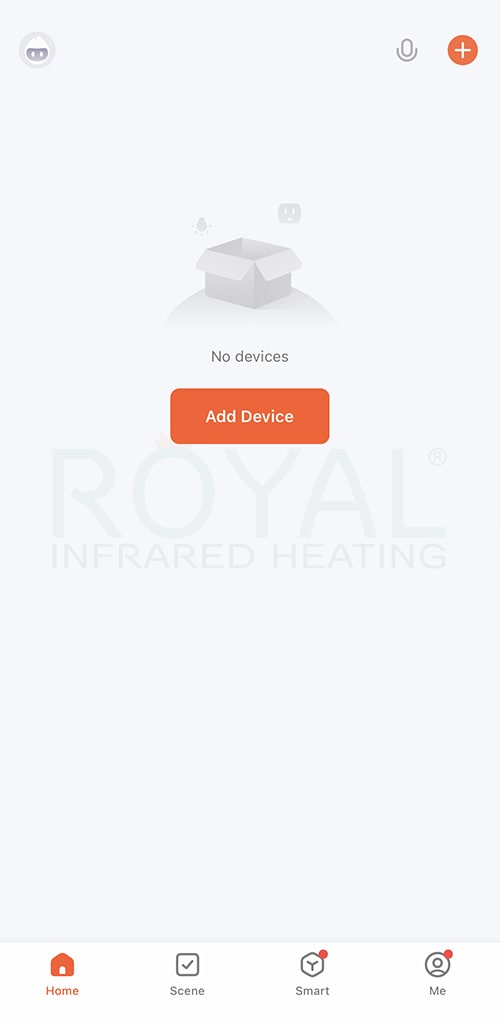
8. Add the Thermostat to the App

Open the Tuya Smart app and navigate to the main Home screen.

Tap the orange Add Device button in the centre of the screen, or use the + icon in the top-right corner.

The app will open the device selection menu, allowing you to choose the thermostat and begin the WiFi setup process.

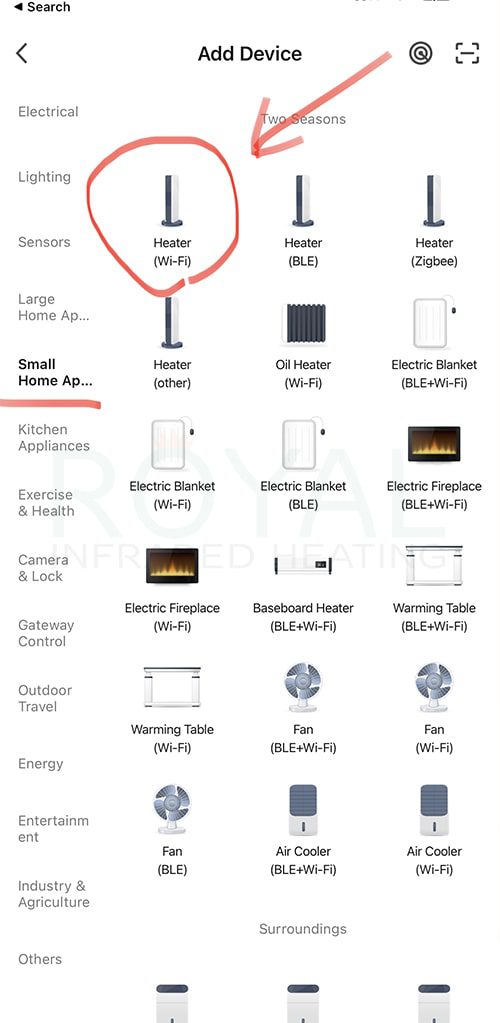
9. Select the Correct Device Type

In the Add Device menu, scroll down the categories on the left and select Small Home Appliances.

Find and tap Heater (WiFi), as highlighted in the illustration.

Follow the on-screen instructions to continue pairing the thermostat with your home WiFi network.

Make sure your smartphone is connected to a compatible 2.4 GHz WiFi network before proceeding.

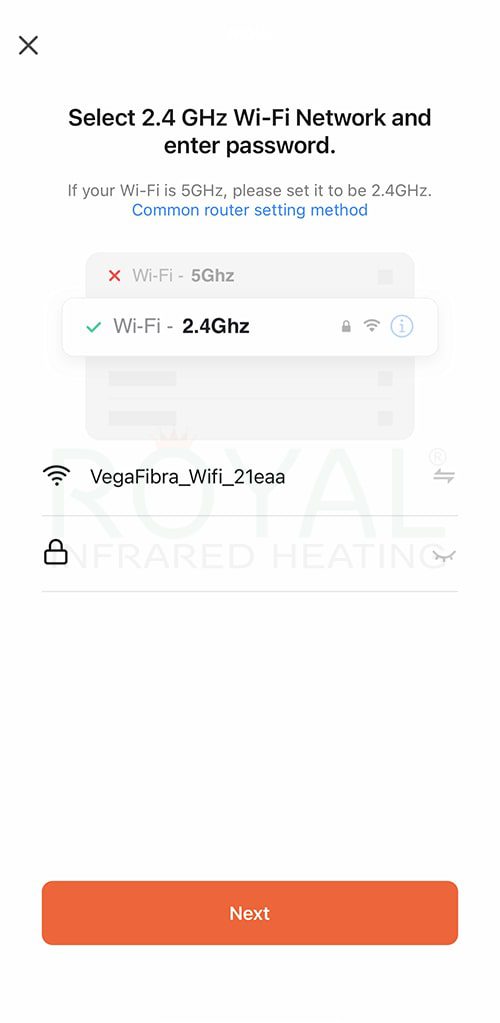
10. Connect to Your WiFi Network

Select your home WiFi network and make sure it operates on the 2.4 GHz frequency, as required for connecting the thermostat.

Enter your WiFi password in the designated field and check that the details are correct.

Tap Next to continue with the connection process.

Please note: If your router uses a 5 GHz network, switch to the 2.4 GHz network before proceeding.

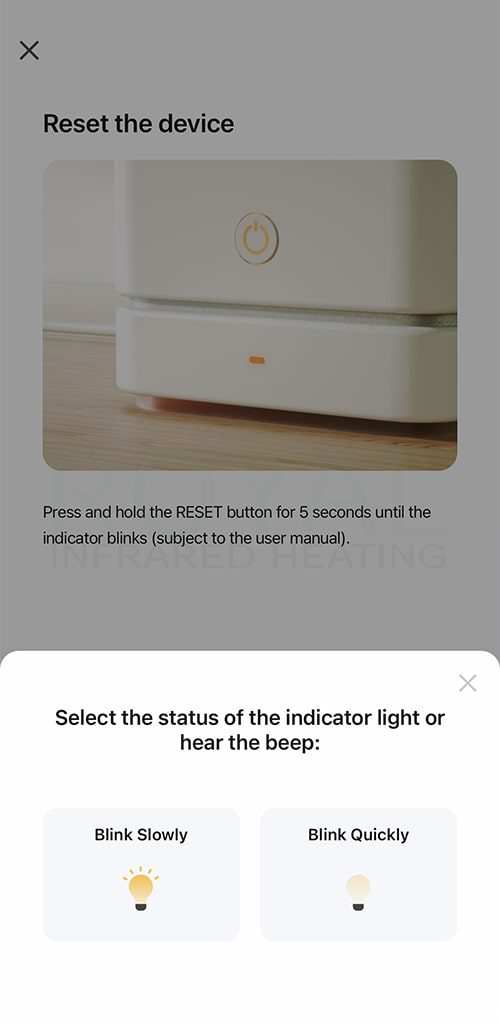
11. Confirm the WiFi Indicator

The Tuya Smart app will ask you to confirm the status of the thermostat’s WiFi indicator.

Check that the indicator is flashing, showing that the thermostat is ready for pairing.

Select Blink Slowly or Blink Quickly, depending on how the indicator is flashing.

Follow the on-screen instructions to continue connecting the thermostat to your WiFi network.

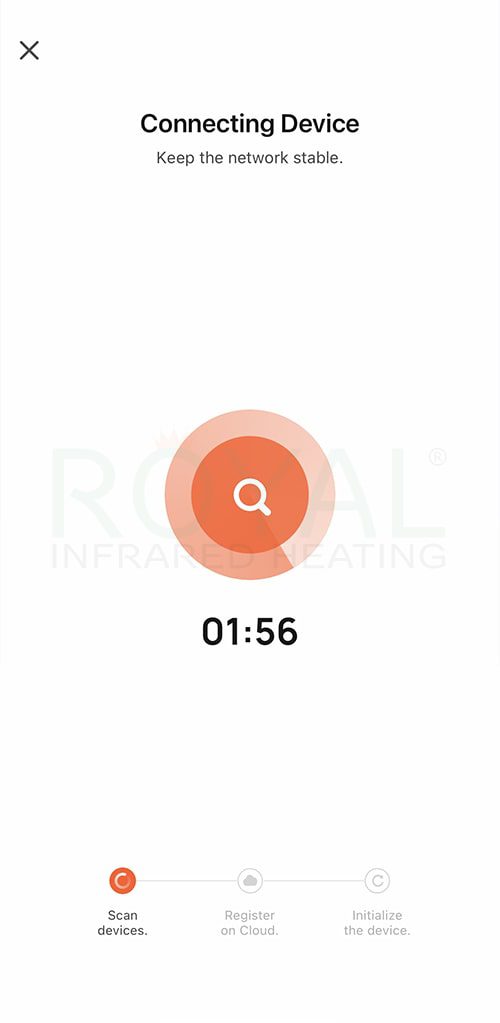
12. Complete the Device Connection

Once the WiFi indicator has been confirmed, the Tuya Smart app will automatically begin searching for the thermostat.

Keep your smartphone connected to the 2.4 GHz WiFi network and maintain a stable internet connection throughout the process.

The app will scan for the device, register it on the cloud and complete the initial setup.

Wait until the connection is successful before closing the app or changing your WiFi settings.

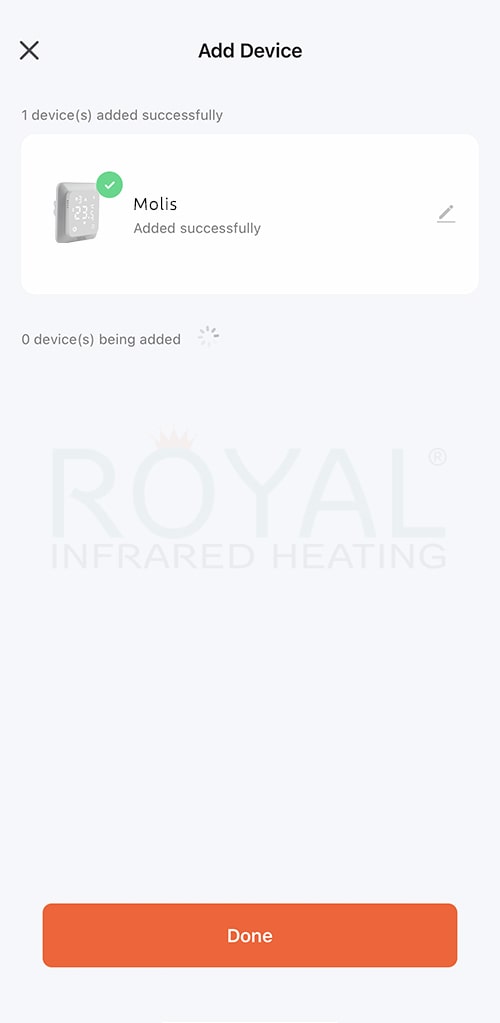
13. Complete the Thermostat Setup

Once the WiFi connection is successful, the Tuya Smart app will display a confirmation showing that the thermostat has been added.

Check that a green tick appears next to the device name, confirming that the connection is complete.

Tap Done at the bottom of the screen to finish the setup and access your thermostat’s controls.

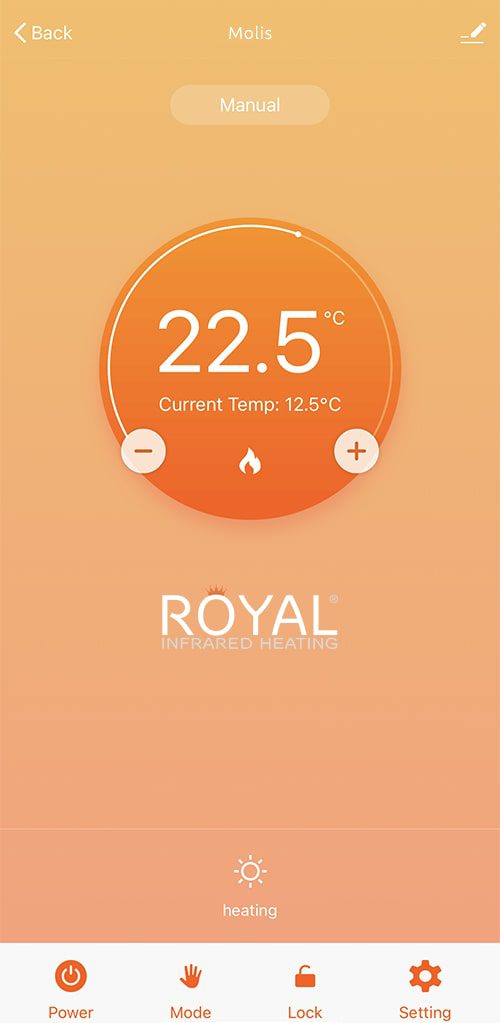
14. Control Your Heating from Your Phone

Once connected, the thermostat’s main control screen will appear in the Tuya Smart app.

View the current room temperature and adjust your desired temperature using the + and − buttons on the circular control.

Use the bottom menu to switch the heating on or off, select an operating mode, activate the child lock or access additional settings.

You can now conveniently manage your heating directly from your smartphone.

Royal-Infrared-heating-colored-trafemark

INNOVATIVE SOLUTIONS

Efficient, durable and designed for modern living

WIDE PRODUCT RANGE

Infrared heaters and saunas for every space

PERSONALISED SERVICE

Expert advice before and after your purchase

FAST, SECURE DELIVERY

Carefully handled delivery across Europe

Based in Spain

Local stock & support from our Spanish warehouses

Warranty Included

Reliable cover for complete peace of mind

ESTABLISHED SINCE 2010

Trusted infrared expertise built over many years

EUROPE-WIDE SERVICE

Supporting homes and businesses across Europe

icon-smart-thermostats

Thermostat Avis Pro Setup Guide

icon-smart-thermostats

Avis Pro

Step-by-step installation and setup guidance to help you install, configure and control your Avis Pro heating system safely and efficiently

ES-high-quality-components-whiten
fv26

Website rating

4.9 Royal Infrared Heating reviews

Based on 900+ reviews

Effortless Installation for Maximum Comfort

At Royal Infrared Heating®, we believe heating control should be simple, convenient and hassle-free. The Avis Pro plug-in socket thermostat offers an easy way to manage your heating without complicated installation or electrical wiring. Simply plug the Avis Pro into a suitable wall socket, then connect your infrared heater directly into the thermostat. Its practical plug-and-play design makes it an ideal solution for controlling room temperatures with minimal setup.

Quick and Simple Socket Use

Setting up your Avis Pro thermostat takes just a few simple steps. Plug the thermostat into a suitable mains socket, then plug your infrared heater into the socket on the Avis Pro. The thermostat automatically controls the power supplied to your heater according to your selected temperature, switching the heating on and off as needed to maintain a comfortable room.

There’s no wall mounting, drilling or hardwiring required. Just ensure your heater is compatible with the thermostat’s electrical rating, follow the setup instructions and enjoy convenient temperature control. Our step-by-step Installation & Setup Guide is available below.

1. Download the Tuya Smart App

Scan the QR code shown in the installation guide to download the Tuya Smart app directly to your smartphone.

Alternatively, search for Tuya Smart in the Google Play Store or Apple App Store.

Install the app and ensure your smartphone is connected to your home WiFi network before proceeding with the thermostat setup.

2. Open the App and Create an Account

Once the Tuya Smart app is installed, open it on your smartphone.

Tap Sign Up to create a new account, or select Log In if you already have one.

Follow the on-screen instructions to begin registration and prepare your account for connecting the thermostat.

3. Register Your Account

Select your country or region and enter your email address in the registration form.

Read and accept the Privacy Policy and User Agreement, then tap Get Verification Code.

Check your email for the verification code and enter it in the app to continue registration.

Once your account is ready, you can proceed with connecting the thermostat to WiFi.

4. Enter the Verification Code

Check your email inbox for the verification code sent by the Tuya Smart app during registration.

Enter the six-digit code into the verification fields displayed on your smartphone.

If you haven’t received the email, check your spam folder or tap Resend to request a new verification code.

5. Create Your Account Password

Once your email address has been verified, the app will ask you to create a password for your account.

Choose a secure password and enter it in the designated field.

Tap Done to complete your registration and access the Tuya Smart app, where you can begin connecting your thermostat.

6. Enable Bluetooth Permissions

After completing registration, open the Add Device section in the Tuya Smart app.

The app may request permission to access your smartphone’s Bluetooth connection to discover nearby devices.

Turn on Bluetooth in your phone settings, then tap Continue to grant the required permissions and proceed with adding your thermostat.

7. Activate WiFi Pairing Mode

Before adding the thermostat to the app, make sure it is powered on and ready for WiFi connection.

Press and hold the two touch buttons indicated by the green arrows in the illustration until the WiFi indicator begins flashing.

Once the indicator is blinking, the thermostat is ready to be connected through the Tuya Smart app.

13a-tuya-app-setup-suide-royal-infrared-heating-spaon-portugal-for-thermostat-heater-control-min

8. Add the Thermostat to the App

Open the Tuya Smart app and navigate to the main Home screen.

Tap the orange Add Device button in the centre of the screen, or use the + icon in the top-right corner.

The app will open the device selection menu, allowing you to choose the thermostat and begin the WiFi setup process.

9. Select the Correct Device Type

In the Add Device menu, scroll down the categories on the left and select Small Home Appliances.

Find and tap Heater (WiFi), as highlighted in the illustration.

Follow the on-screen instructions to continue pairing the thermostat with your home WiFi network.

Make sure your smartphone is connected to a compatible 2.4 GHz WiFi network before proceeding.

10. Connect to Your WiFi Network

Select your home WiFi network and make sure it operates on the 2.4 GHz frequency, as required for connecting the thermostat.

Enter your WiFi password in the designated field and check that the details are correct.

Tap Next to continue with the connection process.

Please note: If your router uses a 5 GHz network, switch to the 2.4 GHz network before proceeding.

11. Confirm the WiFi Indicator

The Tuya Smart app will ask you to confirm the status of the thermostat’s WiFi indicator.

Check that the indicator is flashing, showing that the thermostat is ready for pairing.

Select Blink Slowly or Blink Quickly, depending on how the indicator is flashing.

Follow the on-screen instructions to continue connecting the thermostat to your WiFi network.

12. Complete the Device Connection

Once the WiFi indicator has been confirmed, the Tuya Smart app will automatically begin searching for the thermostat.

Keep your smartphone connected to the 2.4 GHz WiFi network and maintain a stable internet connection throughout the process.

The app will scan for the device, register it on the cloud and complete the initial setup.

Wait until the connection is successful before closing the app or changing your WiFi settings.

13. Complete the Thermostat Setup

Once the WiFi connection is successful, the Tuya Smart app will display a confirmation showing that the thermostat has been added.

Check that a green tick appears next to the device name, confirming that the connection is complete.

Tap Done at the bottom of the screen to finish the setup and access your thermostat’s controls.

9-tuya-app-setup-suide-royal-infrared-heating-spaon-portugal-for-thermostat-heater-control-min

14. Control Your Heating from Your Phone

Once connected, the thermostat’s main control screen will appear in the Tuya Smart app.

View the current room temperature and adjust your desired temperature using the + and − buttons on the circular control.

Use the bottom menu to switch the heating on or off, select an operating mode, activate the child lock or access additional settings.

You can now conveniently manage your heating directly from your smartphone.

10-tuya-app-setup-suide-royal-infrared-heating-spaon-portugal-for-thermostat-heater-control-min
Royal-Infrared-heating-colored-trafemark

INNOVATIVE SOLUTIONS

Efficient, durable and designed for modern living

WIDE PRODUCT RANGE

Infrared heaters and saunas for every space

PERSONALISED SERVICE

Expert advice before and after your purchase

FAST, SECURE DELIVERY

Carefully handled delivery across Europe

Based in Spain

Local stock & support from our Spanish warehouses

Warranty Included

Reliable cover for complete peace of mind

ESTABLISHED SINCE 2010

Trusted infrared expertise built over many years

EUROPE-WIDE SERVICE

Supporting homes and businesses across Europe

icon-smart-thermostats

Thermostat Poer 26 Installation & Setup Guide

icon-smart-thermostats

POER 26 SETUP

Easy-to-follow installation and setup instructions for connecting your Poer 26 thermostat, setting heating schedules and configuring WiFi control

ES-high-quality-components-whiten
fv26

Website rating

4.9 Royal Infrared Heating reviews

Based on 900+ reviews

Effortless Installation for Maximum Comfort

At Royal Infrared Heating®, we make smart heating control practical and convenient. The Poer 26 WiFi programmable thermostat is designed to manage electric underfloor heating, electric radiators and other compatible heating equipment. Its compact wall-mounted design, clear LCD display and flexible programming options make temperature management straightforward. With the correct installation and configuration, Poer 26 delivers dependable heating control. Electrical connections must be completed by a qualified electrician.

Quick and Simple Wall Mounting

The Poer 26 thermostat is compatible with standard 86 mm mounting boxes and 60 mm European wall boxes. Installation involves removing the front cover, connecting the wiring according to the supplied diagrams and securing the backplate with two screws. Once fitted, configure the time, temperature and heating schedules, then connect to WiFi through the POERsmart app for remote control. Follow our step-by-step Installation Guide below for full instructions.

1. Prepare the Installation Tools

Before installing the thermostat, make sure you have the necessary tools and mounting accessories ready.

You may need a screwdriver, a suitable drill bit, a wall mounting box and the appropriate fixings for your wall type.

Please note: The drill bit, plastic wall box and installation tools are not included in the thermostat package. These can be purchased separately from Leroy Merlin or a similar hardware store.

Our friendly team is always happy to recommend the correct accessories and can even help you order everything you need for delivery directly to your home.

2. Prepare the Wall Opening

Choose a suitable position for your thermostat, away from moisture, water and condensation.

If a compatible mounting box is not already installed, a suitable wall opening must be prepared using the appropriate drilling equipment.

The thermostat is compatible with 86 mm concealed mounting boxes and 60 mm European mounting boxes.

Please note: The drill bit and plastic mounting box must be purchased separately. Our team can help you select the correct products and arrange home delivery.

Wall preparation and electrical installation should be handled by a qualified professional.

3. Drill the Wall Opening

Choose a suitable position for the thermostat and mark the location where the electrical mounting box will be installed.

Using an electric drill with an appropriate hole saw attachment, carefully create an opening in the wall.

Please note: The drill and hole saw attachment are not included in the installation set. They can be purchased separately from Leroy Merlin or a similar hardware store.

4. Prepare the Mounting Opening

Once the drilling is complete, carefully remove any loose material and check that the opening is clean and correctly sized for the electrical mounting box.

Ensure the opening is properly positioned and ready for installation.

Need assistance? Our friendly team can help you select the correct drilling accessories and mounting box, or even assist with ordering them for delivery directly to your home.

5. Install the Electrical Mounting Box

Place a suitable plastic electrical mounting box into the prepared wall opening and secure it according to the manufacturer’s instructions.

A qualified electrician should carefully route the necessary power supply and heating cables into the box, leaving sufficient length for connection to the thermostat.

Please note: The plastic mounting box is not included in the installation set and must be purchased separately.

6. Prepare the Electrical Connections

With the mounting box securely installed, carefully position the power supply and heating cables so they are ready for connection to the thermostat.

Ensure the cables are correctly identified, properly arranged and accessible for the next installation step.

Important: All electrical work must be carried out by a qualified electrician, with the power supply completely switched off during installation.

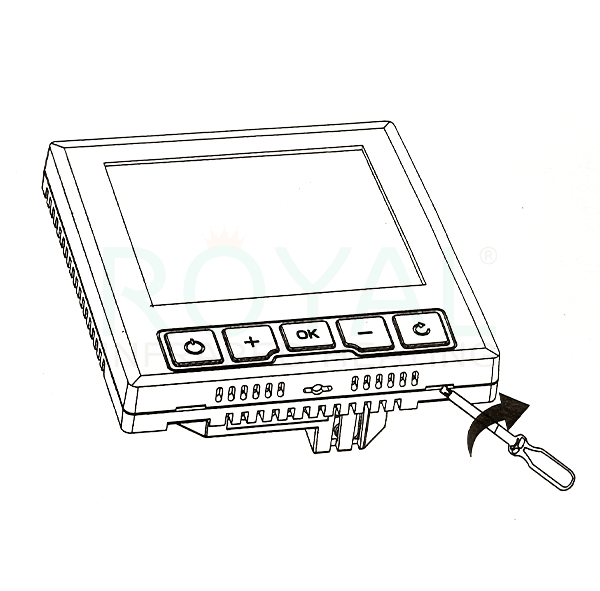
7. Open the Thermostat Cover

Before proceeding, ensure the electrical power supply is completely switched off.

Insert a small flat-blade screwdriver into the opening at the bottom of the thermostat and gently release the front cover.

Carefully separate the front panel from the backplate to access the wiring terminals and mounting points.

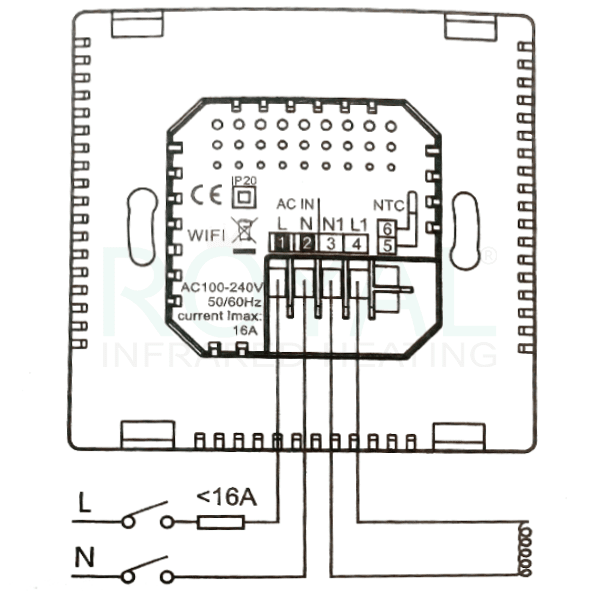
8. Connect the Electrical Wiring

A qualified electrician should connect the power supply and heating system to the appropriate terminals, following the supplied wiring diagram.

Ensure all connections are correctly positioned and securely tightened before fixing the thermostat to the mounting box.

Important: The thermostat requires a 100–240V AC power supply and supports a maximum switching load of 16A. All electrical connections must be completed by a qualified electrician.

9. Secure and Set Up the Thermostat

Once the electrical connections are complete, securely attach the thermostat’s backplate to the mounting box using the two fixing screws.

Carefully refit the front cover, ensuring it clicks into place and sits firmly against the wall.

After the electrician has checked the installation and restored power, use the thermostat’s control buttons to set the time, adjust your desired temperature and configure your preferred heating schedule.

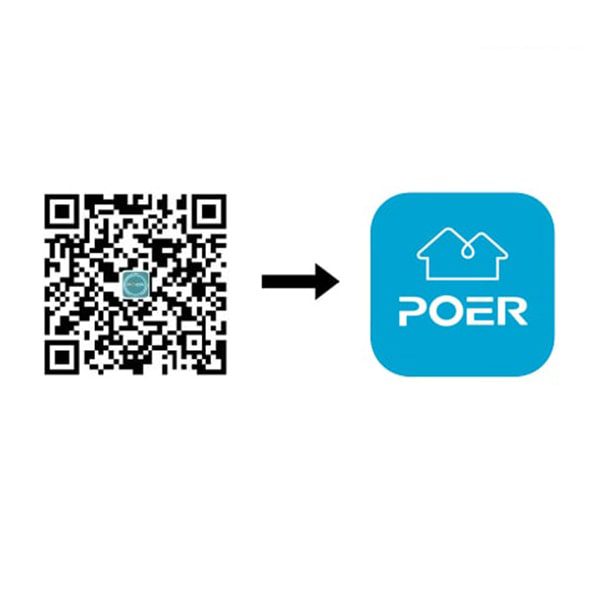
1. Download the POERsmart App

Scan the QR code provided in the installation guide or search for POERsmart in the Google Play Store or Apple App Store.

Download and install the app on your smartphone.

Open the app and create a new account by following the registration instructions, or sign in if you already have one.

2. Add the Thermostat to the App

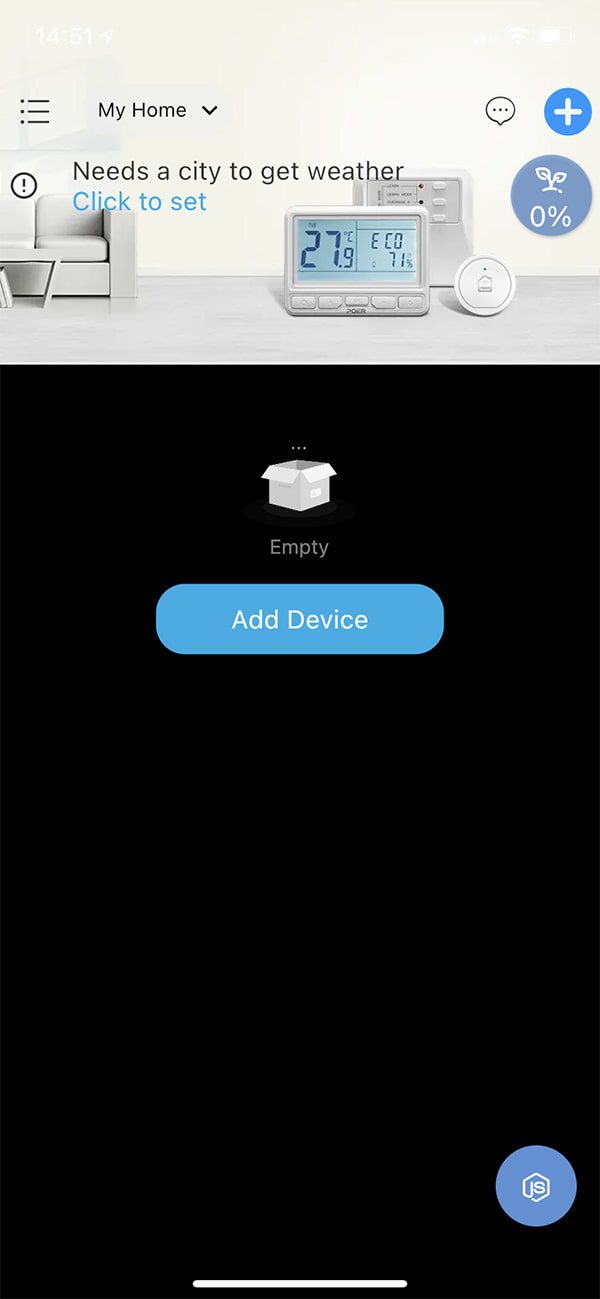
Open the POERsmart app and tap the blue Add Device button on the main screen.

Follow the on-screen instructions to begin connecting the thermostat to your WiFi network.

Ensure the thermostat is powered on and your smartphone is connected to your home WiFi before proceeding.

3. Activate WiFi Pairing Mode

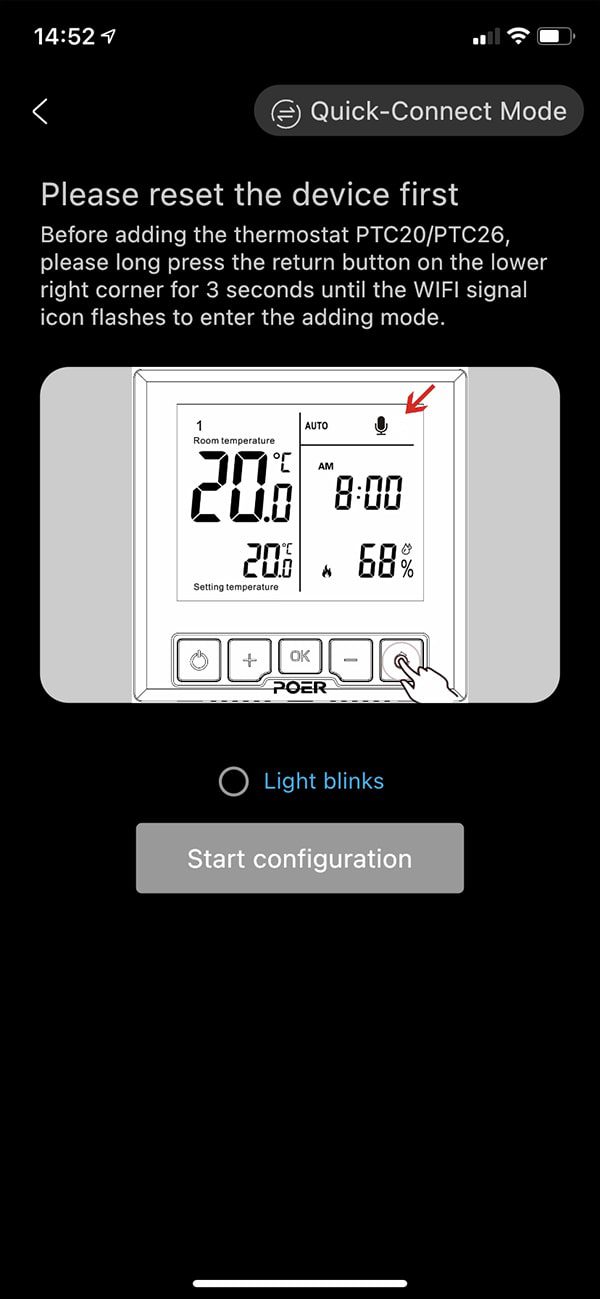
On the thermostat, press and hold the return button in the bottom-right corner for approximately 3 seconds until the WiFi indicator begins flashing.

In the POERsmart app, select Light blinks to confirm that the thermostat is ready for pairing.

Tap Start configuration and follow the remaining on-screen instructions to complete the WiFi connection.

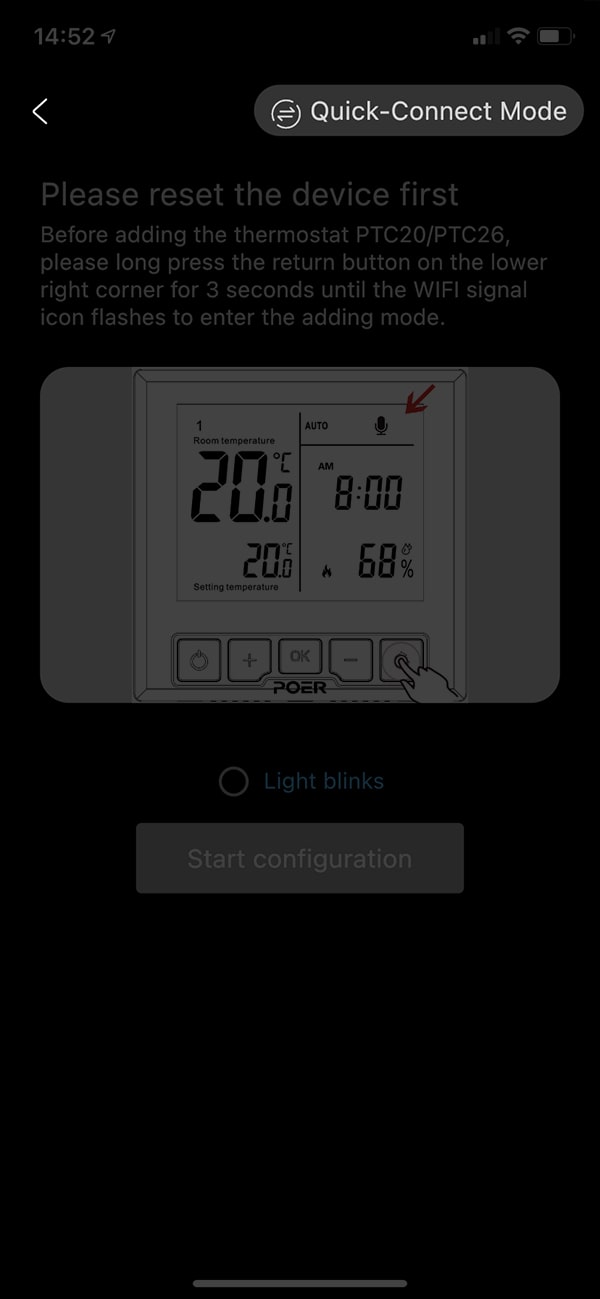
4. Complete the WiFi Connection

Once the WiFi indicator is flashing, select Light blinks in the POERsmart app to confirm that the thermostat is ready for pairing.

Tap Start configuration and follow the on-screen instructions to connect the thermostat to your home WiFi network.

Keep your smartphone close to the thermostat until the connection is complete.

5. Control Your Heating Remotely

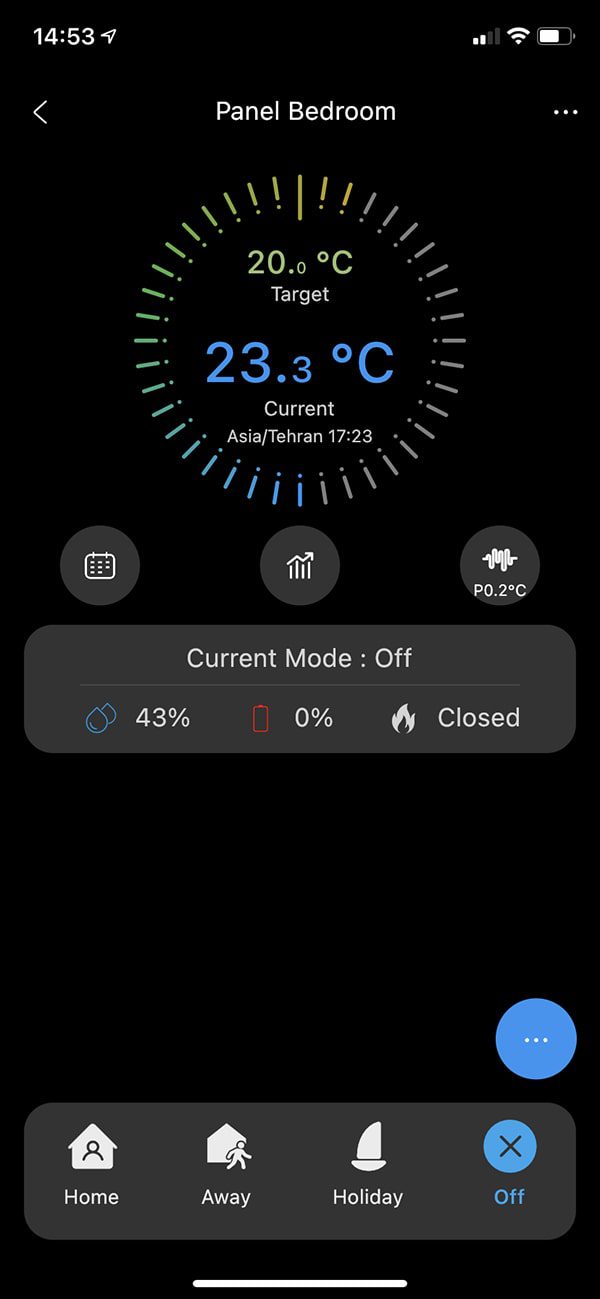
Once connected, select your thermostat in the POERsmart app to access the main heating control screen.

View the current room temperature, adjust your desired temperature and manage your heating directly from your smartphone.

Choose between available modes, including Home, Away, Holiday and Off, to match your daily routine and heating preferences.

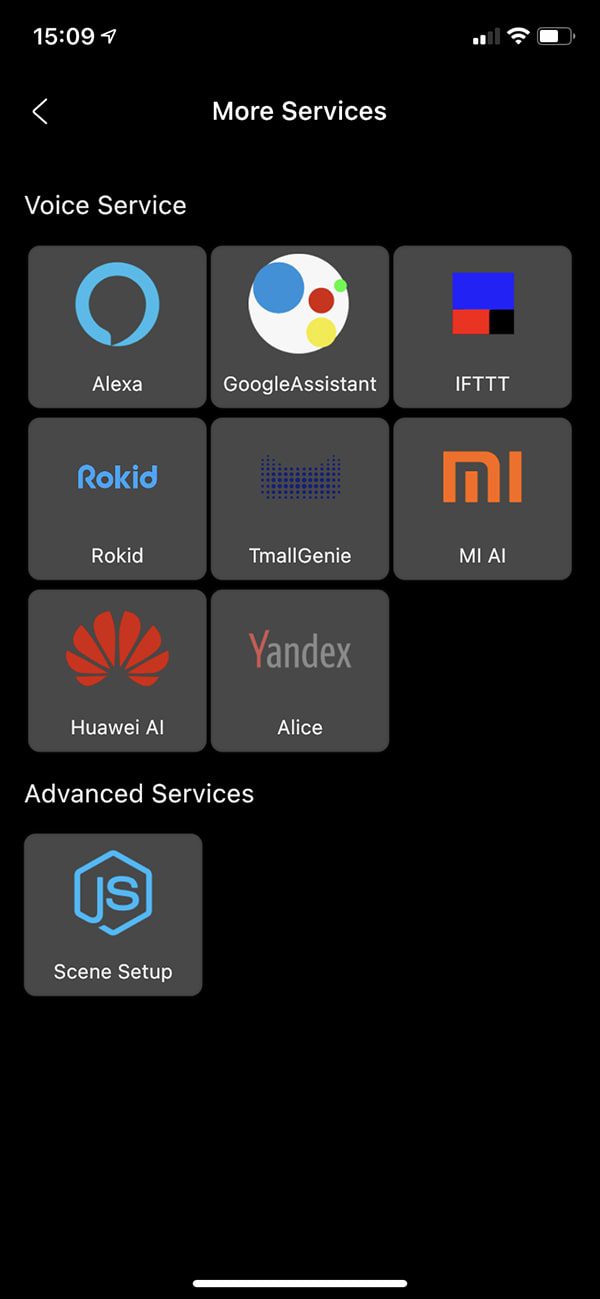
6. Explore Voice and Smart Home Control

Open the More Services section in the POERsmart app to explore available voice assistants and smart home integrations.

The app displays services including Amazon Alexa, Google Assistant and IFTTT, alongside other smart home options.

Select your preferred service and follow the instructions to link your account and configure compatible smart heating controls.

Please note: Availability and functionality may vary depending on your device, region and connected service.

Royal-Infrared-heating-colored-trafemark

INNOVATIVE SOLUTIONS

Efficient, durable and designed for modern living

WIDE PRODUCT RANGE

Infrared heaters and saunas for every space

PERSONALISED SERVICE

Expert advice before and after your purchase

FAST, SECURE DELIVERY

Carefully handled delivery across Europe

Based in Spain

Local stock & support from our Spanish warehouses

Warranty Included

Reliable cover for complete peace of mind

ESTABLISHED SINCE 2010

Trusted infrared expertise built over many years

EUROPE-WIDE SERVICE

Supporting homes and businesses across Europe